We all know that Windows 10 is approaching its end-of-life in October 2025, which means no more security updates, feature updates, or official support from Microsoft. Many users with older PCs that do not meet Windows 11’s stringent hardware requirements will be left with limited options. Microsoft officially restricts Windows 11 installation to systems with at least an 8th-generation Intel processor or an AMD Ryzen 2000 series processor. If your get anything older than that, unfortunately, it won’t support it, unless you use a workaround. This guide will show you how to bypass these restrictions and install Windows 11 24H2 on unsupported hardware using a simple script.
Step 1: Download the Required Files
To install Windows 11 on unsupported hardware, we will use a specialized script to bypass Microsoft’s hardware checks.
- Download the necessary script tool from a GitHub.
- Navigate to your Downloads folder, right-click the downloaded file, and select Extract All to create a new folder containing the required files.
Step 2: Disable Windows Defender if Necessary
Sometimes, Windows Defender may flag such tools as unverified because they lack certification. If prompted:
- Click Run Anyway to proceed.
- If User Account Control (UAC) prompts you with a yellow banner, click Yes to continue.
Step 3: Choose an Installation Method
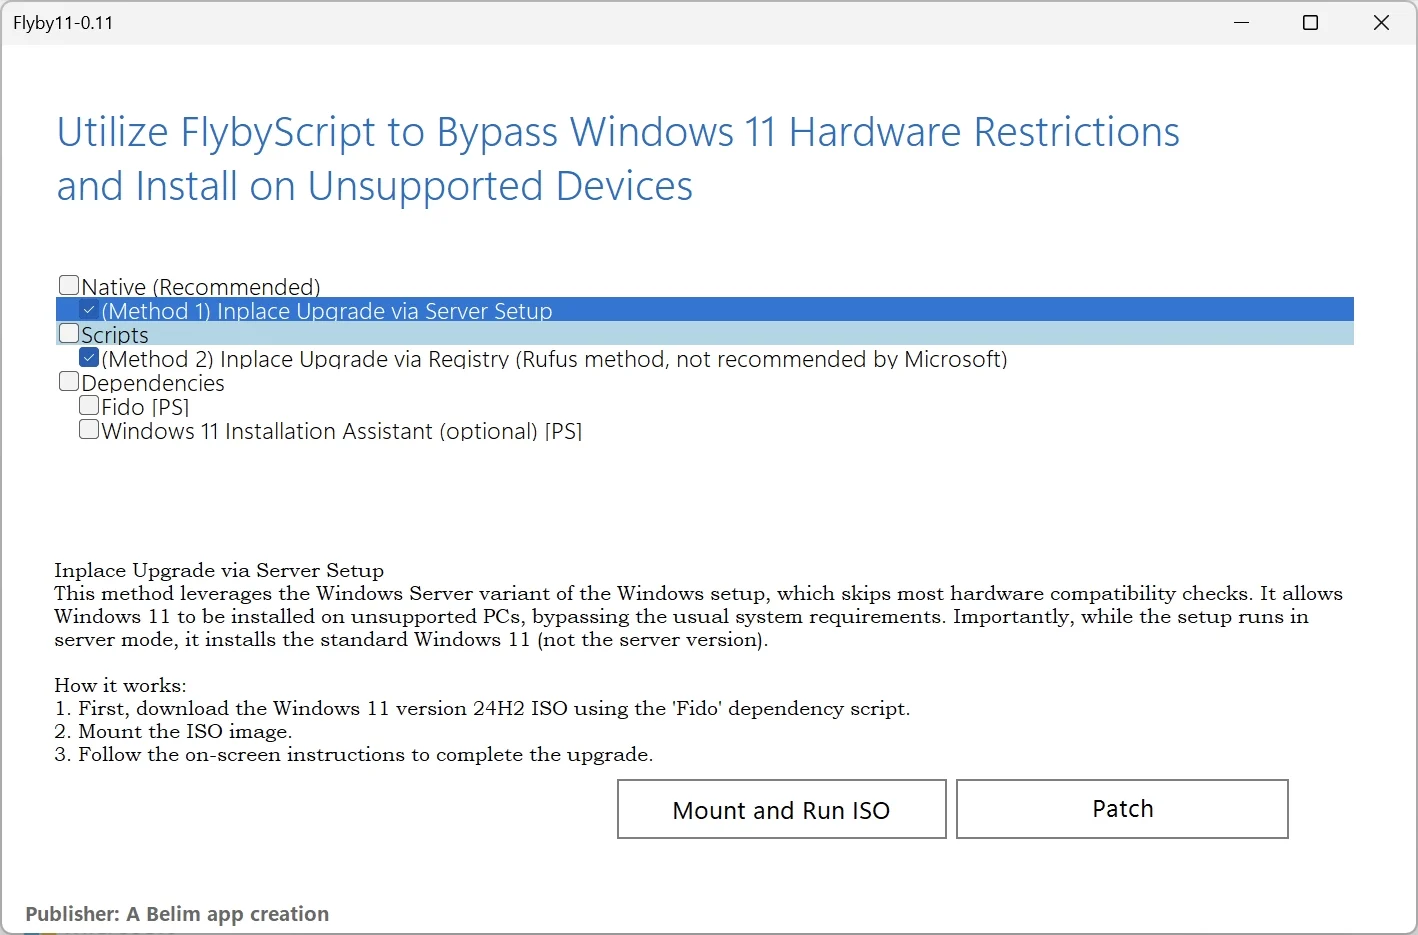
Upon running the script, you will see multiple options for installation. The key methods include:
- Native Recommended – Used for supported PCs.
- Method 1: In-Place Upgrade via Server Setup – The easiest method for unsupported PCs.
- Method 2: Registry-Based Upgrade (Rufus Method) – An alternative method not officially recommended by Microsoft.
- Windows 11 Installation Assistant – Another way to install Windows 11.
We will focus on Method 1: In-Place Upgrade via Server Setup, as it is the simplest way to upgrade while keeping all files and applications intact.
Step 4: Download the Windows 11 24H2 ISO
The script provides a built-in tool called Fido PS, which allows you to download the official Windows 11 ISO directly from Microsoft’s servers.
- Check the box for Fido PS in the script interface.
- Click Patch, and a small window will open.
- Select Windows 11, click Continue, then choose Version 24H2.
- Choose your edition (Windows 11 Home, Pro, or Education) and click Continue.
- Select your preferred language and click Continue.
- Choose x64 architecture and confirm.
- The tool will open a browser window and start downloading the official Windows 11 ISO.
Step 5: Mount and Install Windows 11
Once the ISO is downloaded, proceed with the installation:
- Select Method 1: In-Place Upgrade via Server Setup.
- The script will prompt you to locate the downloaded ISO file.
- Select the file, click OK, and allow the script to mount the ISO.
- A command prompt will appear, showing that the system is being prepared for installation.
- You may see a Windows Server Setup window—do not worry, as this is part of the bypass method.
- Accept the Microsoft terms and conditions.
- Choose the option to Keep files, settings, and applications, then click Next.
- The script will verify available storage and begin the upgrade process.
- Click Install to start the upgrade (even if it says “Installing Windows Server”).
Step 6: Finalizing the Installation
The installation process will proceed as usual. Once complete:
- The system will reboot and finalize the Windows 11 setup.
- After logging in, check that all files and applications remain intact.
- Verify that your system is now running Windows 11 24H2.
Important Notes
- Always back up your data before performing a major OS upgrade.
- While this method allows Windows 11 to run on unsupported hardware, future updates may still be restricted by Microsoft.
- Running Windows 11 on unsupported hardware means you may not receive official support from Microsoft.
By following this guide, you can successfully install Windows 11 24H2 on unsupported hardware, ensuring your PC remains functional beyond Windows 10’s end-of-life. Whether or not you should use this method is up to you, but it provides an option for users who want to keep their current hardware running the latest Windows version.
Let us know your thoughts in the comments! If you have any questions, feel free to ask. Thanks for reading!